Sunday, May 12, 2013

How to Pressurize a Keg with a Paintball CO2 Tank

So, we're headed south for the May Two-Four weekend. Along the way we hope to fill up a keg at one of the brew pubs that we'll pass - and, if we have a keg, we need something to push that beer. A Paintball CO2 tanks seems like the best way to do this and still be practical in the beer fridge (vs. a smaller CO2 pressure system anyway). There are a number of different ways to do this, various adapters are available to do the same thing - however, HomeDepot is just down the street, so it seems easier than ordering something online.

Paintball CO2 tank for keg

Instructions for the fabrication of our Paintball CO2 system for pressurizing kegs are as follows:

Bill of Materials:

1 - 20oz CO2 Tanks
1 - Paintball Universal Fill Adapter
1 - 1/8" MIP x 1-1/2" Brass Pipe Nipple, HomeDepot
1 - 1/4" MIP x 1/8" FIP Pipe Adapter, HomeDepot
1 - CO2 Regulator (IMPORTANT: with right hand thread for gas in)
1 - 1/4" MIP Plug, HomeDepot (if you only want to use one gauge)
AR - Teflon Plumbing Tape, from the tool box


Putting this thing together is a simple as it gets. Use teflon tape on all of the connections. We didn't want the second gauge (tank pressure) to be in the way - mostly to improve portability and stability of the the whole thing system.

 
Paintball CO2 tank for Beer Keg


An important note about regulators. Some regulators will work with this setup, some (likely most) will not. For this setup to work you need a regulator with a free right hand thread on the input side. The lower cost regulator on the left, works. The higher end Tap-Rite regulator on the right doesn't work as the input thread is left hand. Just be careful, finding the appropriate threads for your components is sometimes tricky business.

Monday, May 6, 2013

Fruli Clone Bottled

The Fruli clone was bottled today! And it tastes pretty good! It's really sweet, and a little fruity. It's not quite knock you in the face strawberry as Fruli, but it gets the point across.
I primed each bottle with a Coopers priming sugar tab then capped them.
I'll see what the final product is like in a weeks time.

F.G: 1.006
ABV 4.2%

Next up, I'm going to try this again, except I'll be using fresh strawberries instead of jam.

Saturday, April 27, 2013

Fruli Clone in the Secondary

So I racked the Fruli Clone today.
We added 200g of strawberry jam that was boiled with 100mL of water.
Once the jam/water concoction was cooled to 75F we added it to the secondary.
It's off to bottling next week!


Saturday, April 13, 2013

Fruli Clone Update

So I started off the mash with 1 gallon heated to 145F and added the grains and let the whole thing sit for 30min at 135F. While that was happening I had another gallon of water getting up to a boil. I used that to add to the mash to keep bringing the temperature up. We did a 45min rest at 155F, then 5min at 167F.
The after-boil gravity was 1.038.

Grains post-boil

Wyeat 3944 Belgian Wit yeast


Bitter Orange Peel (left) Coriander Seed (right)


First 30min of the boil nothing was added
30min into the boil Cascade hops added
Yeast is pitched and the magic is about to begin


Friday, April 12, 2013

Fruli Clone

So my better half isn't a huge fan of beer, but we've discovered she enjoys fruit flavoured beers (Fruli, St. Ambrose ect..) I've also been meaning to start experimenting with 1 gallon batches of beer. This seemed like the perfect time to brew a small batch of fruit flavoured beer.

I spent a few hours scouring the internet for a Fruli recipe, but there isn't a lot out there, so I've bodged together one from a couple of sources. The base is going to be a scaled down version of Austin Homebrew's Belgian White Beer. and the strawberry flavour is going to be added with 2/3lbs of strawberry jam added in the secondary.

Austin Homebrews Belgian White Beer (modified for 1 gallon batch and available ingredients)

0.86 lbs Pilsner Malt
0.55 lbs Wheat Malt
0.45 lbs Flake Wheat
.1oz Cascade (leaf) (30min boil)
.1oz Cascade (leaf) (5 min boil)
.1oz Bitter Orange Peel (15 min boil)
.1oz Coriander Seed (15 min boil)
3944 Belgian Witbier yeast
Target OG 1.048
Target FG 1.010

To help scale this I found these tools helpful:

Mash & Sparge water calculation @ brew635.com
Beer Recipe Calculation @ brewersfriend.com

I'll be brewing tomorrow, so I'll post an update soon with pictures. 


Sunday, April 7, 2013

English Style Ordinary Bitter Update

The beer was transferred to the secondary yesterday and the dry hops added.
We'll bottle or keg this coming weekend.

Here are some pictures from brew day:

Kent Golding Hops for the Boil (60min)

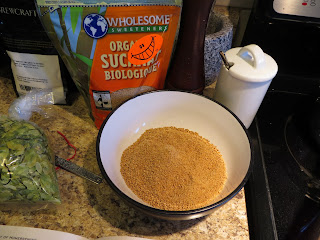
Dried Sugar Cane Juice
English Ale Yeast and Stir Plate
Irish Moss
Grain hanging out in the Mash Tun
The Kettle

Saturday, March 30, 2013

English Style Ordinary Bitter

So we're back up and running with another brew day in New Westminster.
Matt, Kristi and I have decided to take a little more methodical approach to our brewing these days.
We've spent the last few months trying to learn as much as we can about the homebrewing process. To that end we've decided to try a couple of straight forward recipes and follow the instructions as close as we can to see how things turn out. As we get more comfortable with the process we'll start doing wild and crazy things again.

Today we brewed a 5 gallon batch of an English Ordinary Bitter based on the Humpty-Dumpty English Style Ordinary Bitter (see p 292 The complete joy of home brewing 3rd edition by Charlie Papazian).

6 lbs. Marris Otter
1/3 lb Crystal 30
1/4 lb. Honey Malt (original recipe calls for aromatic malt)
6 oz. Dried sugar cane juice (original recipe calls for rapidura)
1.6 oz. Fuggles (Boiling)
1 oz. Goldings (flavour)
1/2 oz Goldings (dry hop)
1/4 tsp. Irish Moss
White Labs British Ale Yeast WLP005
Target OG 1.038-1.040
Target FG 1.006-1.008

Brewing Notes:
-We heated 13L of water for sparging to 170F. We poached some of the water from here to raise the temperature during the mash process (133F to 149F to 158F to 167F)

-To complete the starch conversion we held the mash at 158F for 15min

-Our pre-boil volume was aprox. 5 gallons with an OG of 1.035

-Post boil volume was a little less than 4 gallons with an OG of 1.049

-Our final volume was 5 gallons with an OG of 1.039  and wort temperature of 70.6F

Picture and more info to follow....